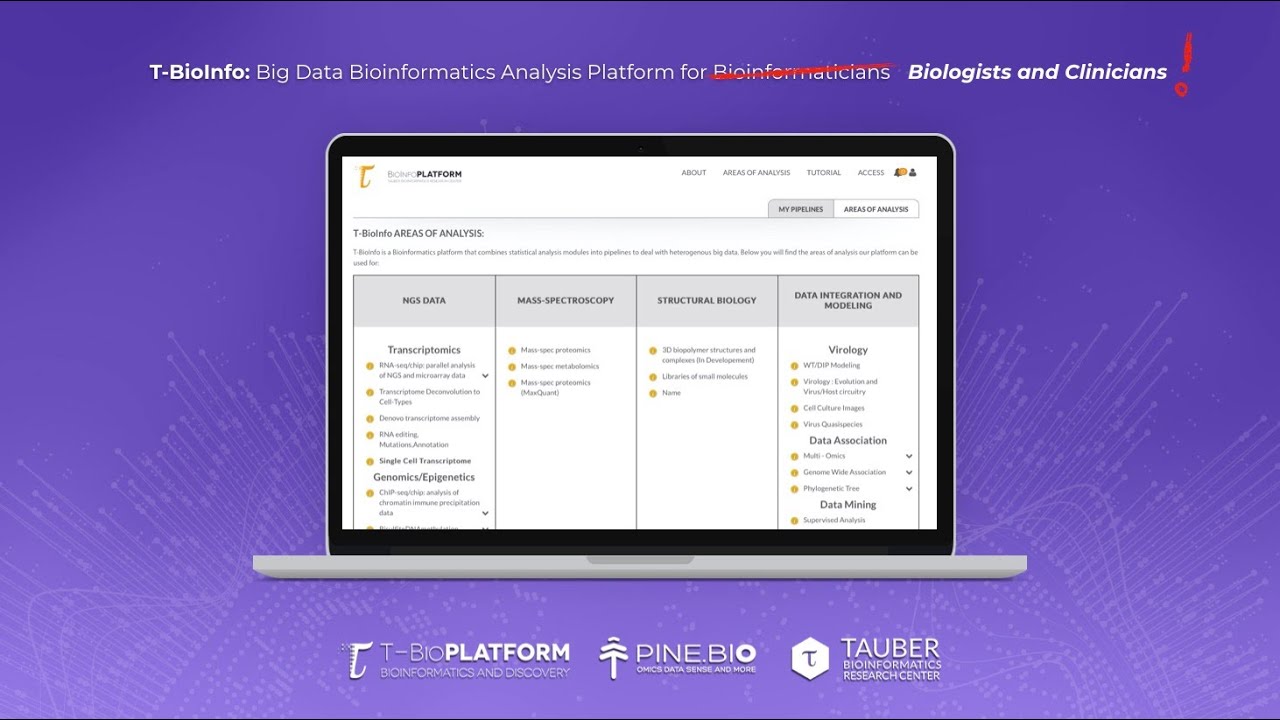
When you open the T-BioInfo platform, you will see a list of data types that correlate with different sections of the platform. As an example, we can choose the RNA seq pipeline by clicking on the RNA-seq/chip: parallel analysis of NGS and microarray data button, before we do that notice that you get an informational tooltip if you mouse over on the section name or the little I icon next to each section. When you open the RNA seq section of the T-Bioinfo platform, you will see several different areas that can help you identify the data type that you’re working with, a reference organism, and then select the analysis in each logical step of the pipeline. First of all, you will see two buttons on the very top, advanced option and predefined option. Advanced option gives more user control and pre-defined option combines some typical approaches into a suggested pipeline that is based on the goal of the analysis and the data that is uploaded by the user. If we select the advanced option, the first step that we need to take is to select inputs from this top section. Then, we will add the necessary number of groups and place a number of files that we want to place inside each group. If this kind of an interface seems complex, in the pre-defined options we have introduced a simple drag and drop interface to make it easier. Then on the bottom, you will see that the area consists of buttons grouped by type and some of the buttons have this Tau sign which indicates that the method or algorithm was developed at the Tauber Bioinformatics Research Center. When your top section selection is complete, you will see that the start button is darker and that means that it's your only option to select.
However, after you select that, you will see a popup with information and the start button normally will give you an overview of the logic behind creating a pipeline in this section. So if you click OK, you will be faced with a number of options that are related to the data input and to your previous selection. As you continue to make selections, you will see more information on each method that you’ve selected with some user input if it’s needed. The defaults are typical of a standard dataset. As you make your selection and add them to the pipeline, the last button to click will be End, at which stage you will be able to name the pipeline and submit it to the queue. When you create the pipeline, you will have to upload files that are either for analysis or for reference. If you selected one of the reference organisms on the platform, you do not need to upload a reference. After the files are uploaded, you can run the pipeline. You will also notice a number of buttons on the top left corner that can help you navigate back to the homepage, open and close the file upload section, navigate informational popups for the section, and select or de-select the automatic popups on the platform. Further to the right, you will see a link to My Pipelines, there you will see a pipeline ID which is an internal method if identifying pipelines, a name that you’ve given to your pipelines, their current status, date at which they were created, and a number of functions that you can perform with the pipeline, such as renaming, deleting, seeing more information, and downloading a PDF report. Note that the state of your pipeline will also be followed by an e-mail and if you have finished the pipeline, you can now click through and see the files that were uploaded as well as the files that were generated by the different jobs in the pipeline. Some of these files could be useful also for other purposes such as machine learning. There are a number of typical uses for the different areas of analysis that are being covered in the tutorial section of the platform. You can navigate to that section by hovering over the tutorial in the menu and selecting the different tutorials that normally contain a video, a text document, and a step by step tour that you can follow. We hope this brief overview gives enough information for you to get started. If you have any questions, please don't hesitate to reach out to us.